Websites, Apps, and Digital Resources

Celebrate National Poetry Month in April!


April is National Poetry Month.  What better way to celebrate than appealing to the interests of middle and high school students by utilizing technology AND allowing for their freedom of expression?  High school students love student choice and embrace the opportunity for their voices to be heard!  

Fortunately for educators, there are a variety of websites, apps,
 and tech tools available that will allow encourage them to assume ownership while creating and designing poetry projects using technology, provide a digital platform for students to read high-interest poetry about modern teen issues, and websites where students can publish their own poetry, express their voices, state their opinions, and display their 
own creations!

Popular Poetry Websites


The mission of this site states that "Family Friend Poems provides a curated, safe haven to read and share touching poems and stories that help heal and offer catharsis through good times and bad. FFP strives to remain accessible to "real people, real life" while also providing a resource to students, teachers and all those who love popular contemporary poetry."  Why do I love this site?  This site is keepin' it real!  Even though some of the topics are difficult, the content is clean without seeming glossed over or artificial.

Teens can also submit poems for publishing.  The site is extensive and deals with real life issues that teens face - from the sorrow over a loved one's death, feelings depression, coping with serious illness, the impact of bullying to coping with betrayal.  This site also includes teaching resources.


Poetry Foundation has an extensive list of websites that both teachers and students can use to celebrate National Poetry Month!  You can find audio files of poems being read out loud, lesson plans, instructional resources, and even informational links to nationwide poetry celebrations and festivals. Feel free to skip to Poetry Foundation's Poetry for Teens as an additional resource for your students to use, select poems to read, and to analyze.


Includes a Poem a Day, Poem in Your Pocket activity, 30 Ways to Celebrate, lesson plans, Dear Poet Project, and more!


How to Read a Poem


Young adults who write, recite, (and in a sense, perform) their own poetry have been trending on social media for the past few years.  Tap into your own students' interests by giving them the opportunity to do the same.  Poetry Out Loud is a great starting point!  Poetry Out Loud's site includes a video series on how to recite a poem. This includes using your eyes, facial expression, physical presence, and voice. The site features yearly contest winners and videos for your students to enjoy.  


What about a site that features poetry both recited AND written by young adults?


Poetry Slam

Consider hosting your own classroom Poetry Slam!  Poetry Slam's website states its mission as the following:  "The mission of Poetry Slam, Inc. (PSi) is to promote the creation and performance of poetry that engages communities and provides a platform for voices to be heard beyond social, cultural, political, and economic barriers." Students will be inspired by Poetry Slam's performance poetry videos and can easily find videos of slam poetry specifically featuring students and teens just like them.


Youth Speaks 

Youth Speaks is a poetry slam contest that specifically highlights teen participants. Interested in learning more about implementing a Poetry Slam with your students? The following digital resources may help you organize this dynamic opportunity for students!


Poetry Out Loud's Lesson Plans

Includes materials for writing poems and lessons in analyzing a poem.


Favorite Poem Project

This website includes a For Teachers  page that reiterates why the Favorite Poem Project was implemented:  "The Favorite Poem Project seeks to improve poetry's place in American classrooms by encouraging active, engaging poetry lessons that emphasize a direct, vocal connection to poems. The lessons presented here focus on appreciating poetry—reading, discussing, and enjoying poems—rather than on the writing of original poetry. Several of the lessons emphasize pleasure in the words and sounds of poems as place to begin—reminding students that poetry is art, and that it is satisfying and exciting to discover a poem that enthralls you and to say it in your own voice."


Education World's Poetry Slam Lesson Plan 

Education World provides guidelines and materials to turn this idea into a dynamic classroom activity and project!


Become a Slam Poet in 5 Steps


Digital Resources for Writing Poetry


Check out the following online resources and websites that provide writing prompts and poetry ideas for students.


Six Word Memoirs

Inspire students to write their own 6 word memoirs or poems.


Underlined (previously titled Figment)

Teen writers express themselves on this supportive social writing site.


Yarn's Poetry Page

YARN is an award-winning literary journal that publishes outstanding original short fiction, poetry, and essays for Young Adult readers, written by the writers you know and love, as well as fresh new voices.


For Struggling Writers


Do your students struggle with writing poetry?  Read, Write, and Think Interactives provide a great, structured platform for creating a poem.  


Go Global!  Publish Your Poetry Online


Let their voices be heard! The following sites provide a public platform for students to publish their own poetry:


Teen Ink: For over 28 years, Teen Ink has published art and literature created by teens. This site frequently includes writing contests for teens, also.


Power Poetry:  The largest online mobile community of teen writers and and poets. Students can submit their own poetry.  The site includes poetry writing tips fr students.  Topics are modern and relevant to teens and tweens today.


All Poetry Publish your poems online.  Opt to enter poetry contests and earn "points" based on reader feedback.


Use Technology to Create and Design


Finally, to celebrate National Poetry Month, check out a few of these great websites and technology tools that your students can use to design a poetry-related project!

You may like the idea of poetry recitation and using one's voice to convey mood, tone, and theme of a poem but your students are hesitant to actually perform in a video recording.

Try using audio-recording tools instead! Students can select a poem he or she finds meaningful.  This could be a poem written by another teen, a favorite poem written by a famous poet, or (better yet) a poem he or she has authored.

Adobe Spark

One of my favorite websites to use for a combination of images 
and recording narration is Adobe Spark's video tool.  
Students can create videos by uploading images and recording their voice - image by image or frame by frame.  Adobe Spark video is user-friendly and does not require the use of any external microphone.  Students can master the art of digital storytelling through the use of imagery and text.  An additional option is to implement background music from Adobe Spark's music library in order to reflect the poem's tone and theme.

This can be utilized for students who may be camera shy and would prefer a "poetry out loud" opportunity that includes their voices reading original poems or poems they have chosen instead of performing in front of an audience of peers.


Pic-Lits Poetry
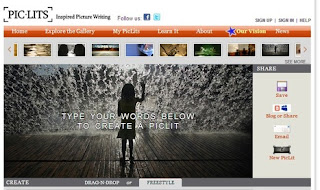
Another great free website that teachers can use for writing poetry is Pic-Lits. Pic-Lits describes their site's purpose is for inspired picture writing.  Using the website's gallery of images, students can select one of two methods for composing poetry.  

The drag-and-drop method allows users to choose a gallery image select words and words and phrases from a word bank.  Students can drag and drop the words onto the image in order to create a poem.

The second method is freestyle.  Freestyle allows students to type their poem directly onto a chosen image.  Students can drag their words onto any area - using word placement in order to reinforce the poem's meaning!  


Take a look at such an example:
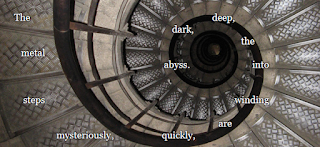

During Teen Tech Week, I hosted a Pic-Lits poetry writing contest.  The image above is one example of the amazing Teen Tech Week submissions made by middle school students.   The student who created this Pic-Lits poem cleverly dragged his words into a curved shape that mimicked the winding staircase with the word "abyss" leading into the dark center point.   The student's word placement on this gallery image reinforces the personification of the metal steps as a pathway that will ultimately guide you into a dark ominous setting.  Teachers can find lesson plans on Pic-Lits sites and a how-to tutorial video link HERE.


The Power of Using Technology and Student Voice


Poetry Technology Projects Resource Bundle
There are many free options that will provide your students with the opportunity to utilize technology and to allow for their freedom of expression - whether it be through their own recitation and intepretation of another's words or an original poem that they created and crafted themselves!

If you would like additional ideas and materials for implementing technology in order to enhance your teaching of poetry, check out this Technology Projects Bundle designed for poetry units and currently available in my Teacher's Pay Teacher's store!


Creating an Animated Flipbook Using Flipsnack 


Recently I attended the South Carolina Educational Technology Conference and learned about Flipsnack - a tech tool and website that will provide students the opportunity to publish animated, interactive flipbooks for free! Using Flipsnack, teachers and students can sign up for an account in order to create and publish three digital books.  The free account limits each of the three books to 15 pages or less.

How does Flipsnack work?  Flipsnack uses HTML5 to convert pdf files to flash.  This website is compatible with all devices - from Chromebooks to iPads. There are multiple ways to create digital books using this site!  Users can create within the site by selecting one of Flipsnack's template options or upload a pdf and/or jpgs and use Flipsnack to publish their creations.  


In order to upload a pdf file, students would first create their digital books using Google Slides or Google Docs.  Both Google Docs and Google Slides provide an option to save or download the file as a pdf. Microsoft Office and Power Point can be used, also.  
Once the book is completed and saved as a pdf, students then upload the pdf file using Flipsnack's upload tool.  Once uploaded, students have additional editing options - including the option to add additional pages and images!


Prior to publishing their uploaded books in Flipsnack, students can customize their books by changing the screen background to a different color or to a texture (similar to changing the background of a slide).  They can also upload an image for the background.


Additional options to customize their digital books include highlighting any hyperlinks that appear on the book's pages, causing the pages to auto-flip or turn, and checking the option for the pages to make a flipping sound when turning.  You MUST check this flip sound option!


Want to see an example?  Check out this flipbook that I first created using Google Slides, then downloaded as a pdf, and uploaded  and published using Flipsnack!


**************************************************************************************


**************************************************************************************


This flipbook includes images, texts, and hyperlinks!  Hyperlinks are still active once you upload your flipbook into Flipsnack.  Students can link to video, audio files, and relevant websites while they create their Flipbooks in Google Docs or Google Slides!


Creating a Flipbook Using Flipsnack's Templates

For more advanced users, you also have the option to create your flipbook using one of Flipsnack's templates.  Students will need to save images outside of the Flipsnack website.

Template options range from a magazine template, a presentation template (widescreen and landscape), a large vertical flyer, and a booklet. After selecting a template, additional options are available to further customize the look of individual pages.  Using the starter templates, users can replace the template's text and images with their own.  They can use Flipsnack's ability to hyperlink text, also.  Users can also insert colored shapes.  Adding pages to the original template is also easy to do by selecting the Page menu.

Though I enjoyed using the option of creating a digital book from a Flipsnack template, it did present some initial challenges.  I had difficulty moving text boxes, for example.  After looking at the editing menu which appears on the right side of your screen, I realized that I needed to make sure that I was working under the first tabbed option (layers) versus the second tabbed menu option (pages).  Once I realized what was causing the difficulty in moving text around on a flipbook page, I clicked off the text box, selected the Layers menu, clicked back on and was then able to easily drag the text box and move the text's location across the page.

Flipsnack is similar to Canva in the advanced editing options that are available - changing the order of text, shapes, and images, recoloring the shapes, inserting hypertext or hyperlinks, customizing the text's color and font type, etc.

Under the pages menu, users can click and drag in order to reorder pages  and select the (+) icon to continue adding more that the template provides.

Here's an example below of a flipbook I created on scientist Rosalind Franklin using the booklet template available at Flipsnack's website:

*********************************************************

Amazing Scientists


*********************************************************

Once students complete their flipbooks, they then select the topic area (Education), have an option of writing a description, and can share with their teachers via link. Free accounts do not have the option to publish privately or to download the flipbooks from the site.

Students will get a kick out of seeing their digital books online.  Using your mouse and hovering over the books pages will create a cool effect as they see the page corners curl.  The flip sound?  Might just be one of my favorite things about the publishing platform.  I'm just sayin'.  Ha, ha!


*********************************************************

Ideas for Using Flipsnack in the Classroom

Flipbooks can be used to display students' research results.  Both sample projects I've posted can be an assessment of  assigned research topics - such as 1970s research and research on an influential scientist. 

Students can be given guidelines for their flipbooks regarding a minimum number of pages, images, etc.  They can also be required to hyperlink a minimum of one related website or video that supports their topic or a site/video providing relevant supplementary information.

If using Flipsnack for research assessment, think of each page of the book in terms of required research subtopics.  Using the 1970s flipbook as an example, students could be required to create a page on influential political figures in the 1970s or for any chosen decade of research, a page noting the foreign relations of the United States during this period of history, a page featuring references from popular culture that existed during this time frame, etc.

Students can use flipsnack to create a digital book based on their reading of ANY text.  Substitute any report with a flipbook published using Flipsnack. By using different images (including symbolic omes), key details and a summary, important vocabulary terms, and related hyperlinks, students can demonstrate what they've learned.  

Flipbooks provide a unique platform for students to highlight key concepts within a text through the selection of different types of media - linked sound and audio files, links to video clips, representative images, and text. Analyzing text through the use of different media types is frequently listed as an acadermic content area standard for BOTH social studies and ELA.

Teachers can also use Flipsnack to create a class book by adding or creating pages featuring their students' work cumulatively in one digital, interactive book.


See Additional Flipsnack Projects

Flipsnack is worth trying out!  There are sample flipbooks created by students in different grade levels that can viewed HERE and in ISTE's informative blog post with student examples HERE.

I also have a teaching resource with all the materials you need for implementation - including a sample Flipsnack based on O. Henry's "The Gift of the Magi" available in my Teachers Pay Teachers store Teen Tech University.  

You can purchase student project sheets with structured directions, how-to handouts, and a grading rubric at the link listed below:


Life as an Instructional Technology Coach

Last school year I was offered a new position in my school.  Prior to this change, I was one of my high school's two media specialists. The position I was offered was one I had been dreaming about for some time - Instructional Technology Specialist!

As a former high school English teacher, I loved creating my own resources for my students!  Prior to leaving the classroom for another position, I was experimenting a lot with technology and providing unique ways for my students to demonstrate their learning and knowledge.

I began utilizing technology and tech tools even more frequently in the 12 years I spent as a middle school and high school media specialist.  During this time, I began receiving an increasing number of requests from teachers to work with their students when creating podcasts, videos, or when using a new presentation tool.  In fact, during my last year as a school media specialist I was receiving more requests than I could handle!


The opportunity I am now provided is ideal for me. I can focus on working directly with teachers in order to enhance their instruction with technology.  I  am able to design PD training and materials that will allow teachers to personalize student learning through choices and differentiation.

Through my collaboration with teachers and my conducting professional development training, I've learned a lot the past two decades!  It's smooth sailing from here!  Right?

Wrong.

This brings me to where I am now.  Though I wouldn't change a thing about what I do and the passion I feel for this position, there are a few stumbling blocks and misconceptions that always seem to arise.  This post is written to address these issues.


1.  We are not experts in all things technology.


There really is no such thing as an expert in technology.  You have some who are more comfortable about technology.  Some of us are passionate about tech tools and the effective use of technology in education.  We seek new things to try.  We read blogs.  

We attend conferences - during our free time -  and over the summer - because we love technology THAT much!

ISTE Conference: San Antonio, June 2017

WE GEEK OUT over technology and the many ways it can benefit both teachers and students.

Despite our passion and enthusiasm, we aren't familiar with ALL new technology, all apps, and all tech tools.

We need time to look over the apps and sites you are interested in - time to examine free accounts vs. paid.  We need a discussion and collaboration to determine your end goals, what content you want to assess, what your expectations are, etc.

All tech tools are not equal.  It's not even about the tech tool - it's about learning and pedagogy.  It's about selecting the right tool that will serve its purpose and will meet your needs and the needs of all of your students.  In light of that, Instructional Technology Specialists or Technology Coaches don't operate on the fly!  We need prep time just like you do!

So, please give US a heads up and time to prepare.  That way, we can better serve you!  I personally never recommend a tech tool I haven't used myself! Please give us the time we need in order to do that!

This brings me to my next point - point number two.


2.  Instructional technology and network administration, hardware, and software maintenance are not the same thing.


Teachers frequently call me, email, or stop by to ask me to fix their Promethean Boards, help with their work laptop when they cannot login from home, help with a software program (that I don't use or maintain since I am not in the classroom nor am I our technology equipment/software contact person).  They still ask for help with their personal devices, help with the school copier....

See where this is going?  : )

Trust me when I say that I would be more than willing to help out if I had an all-encompassing knowledge of any and all things tech.  I don't.  

I will help if I can - regardless if it's my job responsibility or not. Teachers need help RIGHT NOW.  I definitely get that.  What is difficult to me, however, is when I hear..."since you are the technology expert..." 

Instructional technology and technology maintenance are two totally separate areas.

Most of us who work in instructional technology do learn to troubleshoot  various applications that we use, but many of us are still not the contact people, the go-to, the liaison, nor do we have the training to address all "technical issues."

This really is not so much a teacher problem but rather a communication issue or unfortunately, it could stem from a lack of support being given locally for hardware/software maintenance or not enough support being provided to schools on a district level.

Either way, we would appreciate a distinction being made and this being communicated in a helpful way to teachers.  We want this NOT because your asking for help is irritating or taking up the time we need, but because we really hate letting you down.  We hate saying - I don't know.  We don't like having to direct you to a different source  (or the person who HAS to be contacted for help) though it may take days to address the problem you are having. We want to help you right then, but sometimes we just can't.


3.  Instructional Technology Specialists and Technology Coaches love teachers who are open to trying new things.


I personally love it when a teacher contacts me and says, "Hey, our department needs fresh new ideas!  Can we meet with you?" "I want to try that video tool you showed us.  Can you help me set this up?"  "Can you come by in case I need help?"  

Yes. Yes. YES!

I will be there. Two heads are better than one.  I will ask you what your students need help with.  I will check to see if there are unique situations or obstacles.  I will ask to see your project materials so I can select the right tool for you and help create materials to ensure tech activities and projects contain the content that students need to know and that you need them to show!

If it should fail, I will be there by your side with a back-up plan.  We will get through it gracefully together.  I won't let you down.

I don't hesitate to tell students - "I'm not sure!" "I wish this website would do that, but I don't see that as an option.  If you can figure this out, please make sure you give me a heads up!"

There's no shame in mistakes or in not knowing all the answers.

Many times students have shown me things I didn't know about tech tools that I was supposedly teaching THEM to use!  Was it embarrassing to me?  

No!  I was thrilled!  I love it when students figure things out or discover a different way to do things - a capability that I didn't know about prior. That's one more handy tip I can provide to others.  I love it when the student steps into the role of teacher.  Rock on!

In fact, I make sure that I share what a student has discovered or taught me out loud to his or her classmates!  

It's about your attitude and your willingness to learn new things - to show your imperfection.

I've looked at a student before and said, "Ummmm...will you come up here and teach this because I'm beginning to think you know a lot more than me!"  

The class laughed.  They weren't laughing at me, but with me.  The student I was addressing for having those advanced skills beamed with pride.

At the end of the day, technology and tech skills are much more inherent with our younger generation than they will ever be to us.  Embrace that!  Utilize it! Let them teach you!  It's a beautiful thing!

Do not let your fear of the technology hold you back.  EVER!  It's all a learning experience.

We all stumble before we learn to walk.


4.  Though we love your bravery and open mind, we ask that you do your homework before trying to implement new educational technology.


Better yet, let us do the homework with you!  All programs, sites, and apps are not compatible with all devices.  Some things are free but contain limitations that will hinder your students from creating the end result you want.  When you reach out after the fact, it becomes awkward and difficult (if not impossible) to fix.  

Let us handle the compatibility issue.  Let us help in guiding you as to what tool you should choose according to what you want students to know and to learn.

This is what we do.  You are not bothering us by asking for that help.  


5. We are a team!  That's right!  You and I!


I want to enhance what you're already doing and teaching.  That being said, I want you to be by MY side.  In light of that, please don't grade papers or disengage while I am working with your students.

This takes a team effort.  I need you because you are the content area expert.  You also know your students the best!  

In order for you to continue implementing a tech tool, you will need to pay attention, also.  I am asking that you observe and see how I am helping others.  This will eventually allow you the independence you'll need to lead this project on your own.  

Even then, I will still be there for you and be your back up when needed.  

You have to get your feet wet before you can swim!

These are the things we want you to know.  Together, we are stronger!  

Let's never be afraid to forge forward as a team!

Are you ready for our next adventure? 

I know I am!


Digital Portfolio Tools for Education

As a former high school English teacher, then Library Media Specialist, and now Instructional Technology Specialist, I am always on the lookout for new presentation tech tools.

One of the biggest trends that I am seeing at all the recently attended ed tech conferences and workshops (including at this year's ISTE conference) is the emphasis on allowing the expression of student voice.

I was particularly touched by one of ISTE's keynote speakers,  Jennie Magiera.  I highly recommend all educators watch and listen to her inspiring words.


In her keynote address, Jennie discussed "single stories" and how we often rely and judge others on singular understandings of people based on a specific set of characteristics. The goal, she said, is to focus on addressing the untold story rather than the one that can be seen on the surface.

The mistake in making false presumptions and not looking beyond the surface is also beautifully expressed in author Chimamanda Adichie's TedEd Talk "The Danger of the Single Story."

In summation of Chimamanda Adichie's TedEd Talk:

"Chimamanda tells the story of how she found her authentic cultural voice — and warns that if we hear only a single story about another person or country, we risk a critical misunderstanding."

As teachers, how can we allow students to express themselves and to let their own stories be heard?

A great way to allow for students to tell their stories is through the creation of student digital portfolios!

Digital portfolios can serve a variety of purposes.  Students are able to make them individualistic, have control over the look and design, while including content that they write, search for, and select. It becomes a  representation of who they are  - both as students and as people.

What a great way to highlight and showcase their unique voices in the classroom!

Two Free Tech Tools for Student Portfolio Creation

Tech Tool #1: Bulb

I love the polished look of Bulb digital portfolios. And it's free! Though teachers can pay for a subscription (which allows opportunities for a student management system and gives students the flexibility to work on portfolio pages collaboratively), the free accounts also provide more than enough options and features for students. One of the great features in Bulb is the ease of using Google Drive content.

Students can make pages private for public viewing but can share with individuals. Pages created using Bulb has a setting to allow others to comment. This feature provides  a great opportunity to share your portfolio pages and to receive feedback from peers.
The ability to type in content (along with the capability to stylize the font and to create hyperlinks), import Google Drive files, include embedded videos and audio, and insert images are just a few of the generous features that Bulb provides with their free accounts.

I used Bulb with the 12th grade English teachers at my school when they were searching for a new presentation tool to use for their students' Senior digital portfolios.

You can view the sample porfolio template I created for them HEREInterested in implementing Bulb in your classroom? 

Feel free to use my How-To Guide for Creating Bulb Digital Portfolios with your own students!  You will need to log into a Google Account in order to access and copy this guide into your Google Drive!


Tech Tool #2: Adobe Spark Pages.  

This summer, I had the pleasure of attending one'of Monica Burns's tech workshop sessions on creating classroom videos using Adobe Spark. I was so impressed at how user-friendly Adobe Spark is  - whether you create a video, post, or page.

This is a free tool that can be easily used with both secondary and elementary school  students.  Adobe Spark has a browser-based version and is also available as an iOS app

Interested in Adobe Spark's beta Google Play/Android app?  Register in order to use this soon-to-released version at their site.

Students can use virtually any device to create in Adobe Spark.  And it ALSO is free! Just like the website Bulb, students can use Adobe Spark to create dynamic, polished webpages.

There are many things I like about creating pages with Adobe Spark.  First, you can choose from their theme library in order to create different looks for your page (colors, font types, etc).

Secondly, you have great options for inserting images.  Students can use their photo tool to include a photo grid - which is basically a nice picture collage of images. You can also create a glideshow for your page background.  LOVE this!  If you include a glideshow, you will need to upload multiple images.  The resulting scrolling images give a unique panoramic look to your page.

Adobe Spark has a very clean, simple to use tool when creating content on a page.  Students just simply choose from text, photo, and video options.

Though it is very simple, the pages created using Adobe Spark do not appear to be simple or rudimentary.  They're modern and beautiful!

You check out this sample (fictitious) student portfolio page I created using Adobe Spark.

If you would like to use Adobe Spark in order to implement digital portfolios with your students, I recently created a resource for student digital portfolio pages that is featured in my teacherspayteachers store.
The resource is titled "What's Your Story?" and aligns with the theme of allowing student voice and providing an outlet for creative expression.

These top two technology tools are amazing resources for any teacher and students to use for their digital portfolio platforms. Make sure to check both of these dynamic websites and tech tools out!

What's Your Story?  Autobiographical Project


It's hard to believe that 3 years have passed since I first started this blog.  I have missed blogging so much!  I'm ready to return to my roots, blog, and continue with my passion for implementing educational technology in the classroom!

So much has changed in the last few years!  The biggest change has happened professionally!  I was offered my dream job - Instructional Technology Specialist!  I feel so fortunate to have the opportunity to work with teachers and their classes in implementing instructional technology!

I am also the 1:1 coordinator at my school!  Last year, we implemented 1:1 Chromebooks with all of our (approximately) 2400 high school students!  It was a daunting endeavor, but in the end, the process was incredibly smooth!

I will be hosting a session titled 1:1 Win:  Tips for Transitioning to Personalized Learning with 1:1 Chromebooks at  my school district's Upstate Technology Conference!

I hope that I can prepare other teacher leaders, instructional technology coaches, and school administrators with some solid tips that will help ensure their transition will be a success!

I am ecstatic about hearing and hopefully meeting this year's featured conference speakers!


Monica Burns will be in the house! 


From her bio:

Dr. Monica Burns is a curriculum and educational technology consultant, Apple Distinguished Educator, and founder of ClassTechTips.com. As a classroom teacher, Monica used one-to-one technology to create engaging, standards-based lessons for students. Today she spends her time visiting schools across the country and working with PreK-20 teachers to make technology integration exciting and accessible. She also provides support to organizations using technology to reach children and families in need. Her mission is to help educators place tasks before apps and promote deeper learning with technology.


Richard Byrne will be in the house!


From his bio:

Richard Byrne is a former high school social studies teacher who is best known for reaching more than 100,000 educators with his award-winning blog, Free Technology for Teachers and two additional blogs, iPadApps4School.com and PracticalEdTech.com.

As a highly sought-after educational speaker, Richard’s work is focused on sharing free resources that educators can use to enhance their students’ learning experiences. He has received numerous awards and accolades for his contributions to the field of educational technology including being a five-time winner of the Edublogs Award for Best Resource Sharing Blog, Google Teacher certification, and the Merlot Classics award from California State University. Tech & Learning magazine recently named Richard one of the top current leaders who has been instrumental in the creation and advancement of the use of technology in education.

Why is this so exciting to me?

I love Richard's blog Free Technology for Teachers and started following his blog years ago and always learn amazing ideas about recommended sites, apps, and extensions.  He keeps me in the loop!.

I am also a recent follower of Monica's excellent Class Tech Tips Newsletter. When I first heard Monica was a featured speaker, it took me a few minutes to realize this was the very same awesome Monica Burns who pinned amazing posts to my collaborate Educational Technology Pinterest Board.

Thanks to Monica's amazing Class Tech Tips, I found the perfect tool for my teachers to use with their students while creating their senior digital portfolio.  She wrote about the Bulb app or site, and I knew I had to check it out!  I am always looking for great tools that work well with student portfolios.  Using Bulb, I created a sample student portfolio for their senior students to use.  I will include a review of this amazing app and our example of a digital portfolio using Bulb soon!


I will also be posting more about the Upstate Technology Conference in July!  Stay tuned!